CClockTM Version 1.0 User Guide
Copyright © 1999 by
SMC Innovations
|
| |
CClockTM for PalmTM Devices |
Welcome to CClockTM
Getting Started
Using CClockTM
Palm OSTM Feature Integration
Setting Preferences
Modifying the Cities List
Appendix A: Technical Support
Appendix B: End User Software License Agreement
 
|
Congratulations on purchasing CClockTM (pronounced "see clock").
CClock uses the newest proprietary technique to tell time. We
believe that time in the years to come will be increasingly
displayed in this linear format.
This version 1.0 for use on 3Com's PalmTM devices is the very first commercial
release of CClock. CClock allows for a visual map of the
day and is especially useful to plan business and travel
that involves multiple time zones.
|
CClock v1.0 is designed for use on the following Palm
OSTM devices:
- PalmPilotTM 1000 w/version 2.0 OS upgrade
- PalmPilotTM 5000 w/version 2.0 OS upgrade
- PalmPilotTM Personal
- PalmPilotTM Professional
- Palm IIITM
- Palm IIIxTM
- Palm VTM
- Palm VIITM
- IBM WorkPadTM
PalmPilot, Palm III, Palm IIIx, Palm V, and Palm VII are registered
trademarks of 3Com Corporation or its subsidiaries. WorkPad is a
registered trademark of International Business Machines
Corporation. CClock is a registered trademark of SMC Innovations.
All these versions of 3Com's popular hand held organizer and
the WorkPad will be referred to in this User Guide as simply the
PalmTM device.
Any use of CClock represents acceptance of the terms and
conditions set forth in the End User Software License Agreement
included in Appendix B.
Before installing CClock to your PalmTM device, delete all previous copies, if
any, of CClock. To do this, refer to your PalmTM device's Handbook for instructions to delete
Applications.
When you downloaded CClock from the web, you would have
received the files for this user guide, and the following two Palm
OSTM files:
- CClock.prc -- The main CClock executable
- CClkCitiesDB.pdb -- A database of 250 cities that come standard with CClock
Refer to your PalmTM device's
handbook for instructions to load Applications onto your
PalmTM device. Using the Install
Tool from your desktop, install CClock.prc and CClkCitiesDB.pdb.
To start CClock, click on the CClock icon in the application
launcher. The following figure illustrates the initialization
screens presented when CClock is first started after installation.
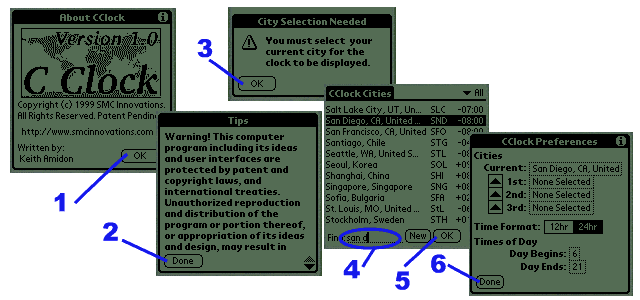
To begin using CClock, follow the steps illustrated above:
-
Acknowledge the CClock splash screen after reading it by
tapping the "OK" button. This screen will only be displayed
the first time CClock is started. If you wish to view it in
the future, it is accessible from any screen with an Options
Menu at the menu item "About CClock".
-
Acknowledge the CClock patent warning after reading it by
tapping the "Done" button. This warning is included to make
you aware of the patent protection for the CClock linear time
display. It reads:
Warning! This computer program including its ideas and user
interfaces are protected by patent and copyright laws, and
international treaties. Unauthorized reproduction and
distribution of this program or portion thereof, or
appropriation of its ideas and design, may result in severe
civil and criminal penalties, and will be prosecuted to the
maximum extent possible under the law. © 1999 SMC
Innovations. All Rights Reserved. Patent Pending.
This screen will also only be shown the first time CClock is
started. If you would like to view it in the future, it is
accessible from the "About CClock" screen info button.
-
CClock has the notion of a "Current City", the city you are
currently in. This dialog box is warning you that the current
city is unknown, and you must therefore select
one. Acknowledge it by tapping the "OK" button.
-
Because CClock does not know your current city, it presents
this dialog box to allow you to select it from the list of
cities provided in the default database. You can scroll the
list using the hardware scroll buttons on the PalmTM device or the small scroll arrows in
the bottom right corner of the display. An even easier way to
find your current city is to write the first few characters of
the city's name which will show up in the area
indicated. CClock will search through the cities list in a way
similar to the PalmTM
Address Book application. If you can not find your city, try
to find a major city nearby. If that fails, select any city
for now, you will learn how to add new cities later.
-
When the appropriate city is highlighted, you can select it by
either tapping the city in the list, or pressing the "OK"
button.
-
Finally, CClock displays the selected current city in the
preferences dialog box. For now, acknowledge that everything
is correct by tapping the "Done" button. If all has gone well,
you should now see a screen similar to the one
below. Congratulations, you are now ready to use CClock!

The following figure shows the main CClock screen, calling out
each item of interest.
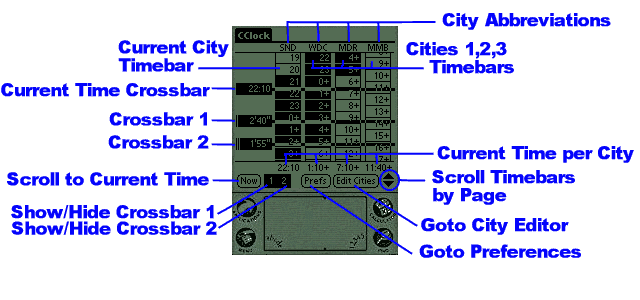
CClock graphically displays the linear nature of time, allowing
for visual comparison of the time in different cities at the
current time and any other time during the day. The linear time
display for each city is a vertical column called a
timebar. This version of CClock displays four
timebars. The leftmost timebar is called the Current City
Timebar, while the other three timebars are simply referenced
by their positions, as the City 1, 2, or 3 Timebar. The
current city is the city for which the PalmTM device's system time is set, the other
cities time displays are shown in relationship to the time in the
current city.
For each timebar:
-
there is a header at the top that displays an abbreviation for
the city whose time is being displayed by the timebar. These
city abbreviations can be changed, as described in the Modifying the Cities List section below.
-
there is a footer at the bottom that gives a digital readout of the current time in the city whose time is being displayed by the timebar.
-
there is a set of cells drawn vertically on the display. Each
cell represents the time for the hour indicated by the label
in the cell. The cell color indicates day or night. Cells with
a white background are displayed for daytime hours, and cells
with a black background are displayed for nighttime
hours. This allows instant visual recognition of appropriate
times to place telephone calls to locations around the world,
etc. To learn how to change the settings for the daytime hours
features, see the Setting Preferences
section below.
The timebars and clock readouts can display time in 12 hour or
24 hour formats. In 12 hour format, am is indicated by an 'a'
suffix, and pm by a 'p' suffix. For both formats, there can be an
additional suffix character that indicates the day offset from the
current date in the current city. The values of this suffix
character are:
| Character |
Meaning |
| = |
day before yesterday |
| - |
yesterday |
| + |
tomorrow |
| # |
day after tomorrow |
If none of these characters are displayed, the time represents
a time in the current day of the current city. The only exception
to this rule is in the few instances when the 12 hour time format
is selected and there is not room to display the entire time with
the date suffix character, in which case the suffix is dropped. In
all these cases however, the existence of the suffix can be
deduced from surrounding information. For more information on
changing the format times are displayed in, see the Setting Preferences section below.
The timebars can be scrolled in two different ways:
-
The onscreen scroll arrows at the bottom right of the
display. These scroll arrows cause the timebars to scroll by
an entire screen with each tap.
-
The hardware scroll buttons. These buttons cause the timebars
to scroll a single pixel with each press.
Both scroll mechanisms can be held down to automatically scroll
further, until the limits of the timebars are reached. CClock
displays the timebars for 24 hours before the current time, and 24
hours after the current time. The Now button
automatically scrolls the timebars to display the current time in
the current city in the upper half of the CClock display.
To assist reading across the timebars and allow simple relative
time calculations, CClock also displays from 0 to 3
crossbars. Each crossbar has a handle at the left of the
timebars, and a narrow bar, called the rule, that is layed
horizontally across them.
The Current Time Crossbar is displayed whenever the
currently displayed portion of the timebars includes the current
time in the current city. Its handle displays this time by
default. The time displayed can be temporarily changed to the
current time in any one of the cities shown in the clock by
tapping and holding the stylus on the portion of the rule that is
within the timebar for the city from which the time reading is
desired. The current time crossbar is fixed and cannot be
manipulated by the user. Its position will only change when the
current time changes or the timebars are scrolled.
Crossbars 1 and 2, also called the first and second crossbars
are optional. They can be shown and hidden by the Show/Hide
Crossbar buttons. The second crossbar is dependent on the
first, as explained below, so the second crossbar can only be
selected to be shown if the first crossbar is already showing. If
both are showing and the first crossbar is hidden, the second will
automatically be hidden as well. Both crossbars are draggable by
tapping and holding down on the handle and then dragging in the
desired direction. If they are dragged to the top or bottom of the
timebars, the timebars will scroll. The resolution of the
PalmTM device's display limits the
granularity of crossbar placement to increments of five minutes.
By default, the handle of the first crossbar displays the
difference in time between the location of the first crossbar and
the current time crossbar in hours and minutes. It can be
temporarily changed to the time at the position of the first
crossbar in any one of the cities shown in the clock by tapping
and holding the stylus on the portion of the rule that is within
the timebar for the city from which the time reading is desired.
By default, the handle of the second crossbar displays the
difference in time between the location of the second crossbar and
the the location of the first crossbar in hours and minutes. It
can be temporarily changed to the time at the position of the
second crossbar in any one of the cities shown in the clock by tapping
and holding the stylus on the portion of the rule that is within
the timebar for the city from which the time reading is desired.
Global Find
The Palm OSTM Global Find
function, accessed from the silk-screen Find button at the bottom
right of the input area on the PalmTM device allows search of multiple databases
stored on the device. CClock intentionally ignores this feature.
The cities database included with CClock is only a support
database and not intended for storing frequently accessed user
data as in the PalmTM Address
Book. The records in the CClock cities database are used strictly
for the configuration and operation of the CClock display
itself. If the user needs to find a city, the incremental search
and scrolling functions provided by the cities list screen
provides convenient navigation of the database. If CClock did
support Global Find in its cities database, it would simply
increase the time for a Global Find to complete, most likely
returning records that you have no interest in.
Infrared Record Transfer
At this time, CClock does not support transferring records in
the CClock cities database through infrared.
Setting preferences is very straightforward. To start the
process, select the Preferences button or the Preferences
menus item (shortcut /R) from the CClock display. The figure below
labels important items in the preferences dialog that appears.

The preferences dialog allows you to select three different
things that affect the operation of CClock:
- The city for each timebar
- The format for time displays.
- The hours that are considered to be daytime
The city for each timebar can be selected by tapping on the
corresponding city select button. This will bring up the
list of cities as illustrated in the figure below.
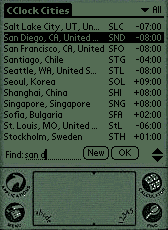
To select a city, scroll to it and tap the name of the
city. Note that the cities are each assigned to a category, as in
the PalmTM Address Book application,
so make sure you are looking at the appropriate category or the
All category. By writing (using graffiti or the onscreen keyboard)
the first few characters of the name of a city, the list will be
automatically scrolled to display the city, in a way similar to
the PalmTM Address Book. With
the correct city highlighted, you can select it by either tapping
the city name or the OK button. If you tap the OK button without
any city highlighted, CClock will assume that you don't want any
city for that timebar. If the city you are trying to select
doesn't exist in the list, you can add it using the New
button. See the Modifying the Cities List
section below for more information about the city edit
screens. Once you have selected the city, you will be returned to
the updated Preferences dialog box.
The preferences dialog box provides two ways to set the current
city, with slightly different behavior. The first is to select the
city select button next to the Current City: label, as
described above. CClock will consider the current time on the
PalmTM device to be the time in
the new city. If the new city is in a different timezone from the
previous current city, the system time on the PalmTM device will remain the same, and the times
in the other timebars will be updated. Note that CClock requires a
current city to be set. If you do not select a city from the list
presented, CClock will gently remind you that you must select a
city and present the list again.
The second method is to tap one of the Switch Given City
with Current City buttons. These three buttons with an upward
facing triangle switch the current city with the city next to the
tapped button. After switching the cities, the dialog box shown in
the following figure will be displayed.
If the Yes button is tapped, the PalmTM device's system time will be changed by
the difference in time between the two cities. In this way while
travelling, you can change the PalmTM device's time and CClock's configuration
of the current city with a single click in CClock instead of
manually changing the time in the PalmTM device's system preference application and
then changing the current city in CClock. Please note that
changing the PalmTM device's
system time can take some time if there are a lot of entries in
the datebook or other applications that use dates and times. This
is because these applications need to check all their entries to
determine whether they have already happened.
If the No button is tapped, the cities will still be
switched, but without changing the PalmTM device's system time. This option is
provided in case the PalmTM
device's time has already been changed, or you do not wish to wait
while the datebook and other date and time related applications
recalculate.
Finally, the last option available in the CClock preferences
dialog box is setting the daytime hours. Daytime hours are
displayed in CClock as white cells, while nighttime hours are
displayed as black cells. This allows instant visual recognition
of appropriate times for placing telephone calls, etc. Tapping
either the Day Begins selector button or the Day
Ends selector button will bring up the system time
selector. The start time indicates the first hour of daylight, and
the end time indicates the last hour of daylight. Note that with
the current implementation the start of daylight hours must always
come before the end of daylight hours.
When all modifications to the preferences are complete, tap the
Done button to return to the CClock display.
The most advanced topic in the use of CClock is learning to add
new cities, and modify cities already provided. To begin modifying
the cities list, tap the Edit Cities button in the CClock
display.
In general, the CClock cities list acts very much like the
phone list in the PalmTM
Address Book. It has a list of records, which are organized by
category. Adding a record, deleting a record, changing the
category of a record, and selecting an existing record to modify
are all accomplished with similar actions. The rest of this
section will explain how to modify an existing city in detail, and
then briefly describe how to add or delete a city, referencing the
discussion on how to modify an existing city.
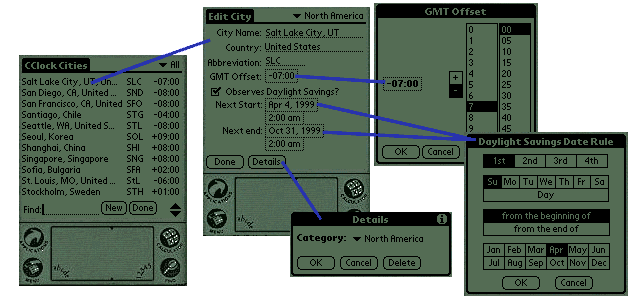
The following figure illustrates the important screens for
modifying a city, and the connections between them.
First, select the city to modify. This can be done in the same
way as selecting a city for a timebar, as described in the Setting Preferences section above. When the
correct city is selected, tap on its name to bring up the Edit
City screen.
The Edit City screen has three standard text fields for the
name of the city, the country the city is in, and an abbreviation
for the city that will be displayed at the top of the timebar. Any
text that fits within the width of the field can be entered in
these fields using grafitti or the onscreen keyboard.
The timezone of the city is specified as an offset from GMT
using the GMT Offset dialog box. In the Edit City screen, the
current GMT offset is displayed in the GMT Offset
Selector. Tapping this selector will bring up the GMT Offset
dialog box. Here, the desired GMT offset can be selected. Tapping
the OK button will return to the Edit Cities screen with
the new GMT offset, while tapping Cancel returns to the
Edit Cities screen without changing the GMT offset.
If the city has daylight savings time at some point during the
year, check Observes Daylight Savings?. This will enable
the four daylight savings fields. The Next Start Selector
displays the date daylight savings will next go into effect, while
the Next End Selector displays the date after which
daylight savings will no longer be in effect. The times underneath
each date display the time each change occurs.
Tapping on the Next Start Selector or the Next End
Selector will display the Daylight Savings Date Rule dialog
box. The date for daylight savings transitions change from year to
year because in most countries, the transitions are scheduled so
as to not occur on work days. The Daylight Savings Date Rule
dialog box allows you to specify the rule for calculating the
transition date. This calculation is done to determine the date
displayed in the Edit Cities screen. Specifying the rule should be
fairly self-explanatory, but the following examples should make
any potential misunderstanding clear:
| Meaning of the Rule |
Selected Items in Dialog Box |
| The first Sunday of April |
1st - Su - from the beginning of - Apr |
| The last Sunday of October |
1st - Su - from the end of - Oct |
| The second to the last day of September |
2nd - Day - from the end of - Sep |
When done specifying the rule, tap the OK button to
return to the Edit City screen with the new rule, or the
Cancel button to return without modifying the old rule.
After the dates of daylight savings transition have been
specified, the times should be specified as well. Tap either time
selector to display the standard time dialog box. The Start Time
is the time daylight saving begins on the next start date, and the
End Time is the time daylight savings ends on the next end date.
When done specifying all fields in the Edit City screen, tap
the Done button to return to the Cities List. Note that
if you do not fully specify daylight savings time when you press
the Done button, the record will be saved as if the city
does not observe daylight savings.
A city can be added to the list by tapping the New
button in the Cities List instead of selecting a city to
edit. Fill out the fields of the new city record as described
above for modifying a city. When complete, tap the Done
button to return to the Cities List with the new city
added. Alternatively, if another city is to be added, selecting
New City from the Record menu (shortcut /N) of
the Edit City screen will save the city that was just added and
clear the Edit City screen for the entry of another city.
A city can be deleted from the list by selecting it as if you
were going to modify it (described above) and doing one of the
following things:
-
Tapping the Details button and then the
Delete button that appears in the Details dialog box.
-
Selecting Delete City from the Record
menu. (shortcut /D)
Categories for cities in the CClock cities list work exactly
the same as the categories in the PalmTM Address Book application. Refer to
your PalmTM device manual for more
information on manipulating categories if you have trouble.
When all editing of the CClock cities list is complete, tapping
the Done button returns to the CClock display.
Congratulations on reading through the entire CClock User
Guide. We hope you have found it informative, and that CClock
provides a significant benefit to you for a long time to come.
Before you question technical support please make sure that
CClockTM was loaded onto your PalmTM
device as per instructions in this user manual. If the problem
persists, experiment to reproduce and isolate the problem. After
ensuring that your problem is repeatable report your problem to techsupport@smcinnovations.com
Every effort will be made to reply promptly, usually within 24
hours.
In the future, visit http://www.smcinnovations.com
to access troubleshooting tips, and for frequently asked
questions.
CClockTM IS SOLD AS A
LICENSED SOFTWARE PRODUCT TO ITS CUSTOMERS FOR THEIR PERSONAL USE
UNDER THE TERMS AND CONDITIONS SET FORTH BELOW. YOU SHOULD
CAREFULLY READ THE TERMS AND CONDITIONS OF THE LICENSE AGREEMENT
BEFORE BUYING CClockTM. IF YOU
DO NOT AGREE WITH THE TERMS AND CONDITIONS OF THE LICENSE
AGREEMENT, DO NOT BUY THE SOFTWARE.
LICENSED USE:
SMC Innovations (Licensor) grants you (Licensee) a nonexclusive
license to use the CClockTM
software (the "Software") on any PalmPilotTM connected organizer, Palm IIITM connected organizer, Palm IIIxTM connected organizer, Palm VTM connected organizer, or WorkPadTM product, subject to the terms and
restrictions set forth herein (License Agreement). The Software is
licensed for your personal use in conjunction with only the
products set forth above. You may use the Software only on one
(1) such product. You are not permitted to lease, rent or
sub-license the Software in a time-sharing arrangement or in any
other unauthorized manner.
BACK-UP OR ARCHIVE:
The Software and supporting documentation may be copied only as
essential for backup or archive purposes in support of your use of
the Software as permitted. When making such copy or copies, you
must reproduce and include all intellectual property right
notices, including but not limited to copyright and patent notices.
INTELLECTUAL PROPERTY RIGHTS:
This Software including but not limited to its ideas and user
interfaces are protected by patent and copyright laws, and
international treaties. Unauthorized reproduction and distribution
of the program or portion thereof, or appropriation of its ideas
and design, may result in severe civil and criminal penalties, and
will be prosecuted to the maximum extent possible under the
law. Except as necessary for the permitted use of this Software,
this License Agreement does not otherwise grant you any rights to
patents and copyrights associated with the Software. No license is
granted for the human readable code of the Software (source
code). The structure, sequence and organization of the Software
are valuable trade secrets of SMC Innovations. You agree to hold
such trade secrets in confidence. Modification, reverse
engineering, reverse compiling, or disassembly of the Software is
expressly prohibited.
TITLE, ASSIGNMENT & TRANSFER:
The title of this Software, including all intellectual property
rights, shall at all time remain with SMC Innovations. You may
transfer the Software and this License Agreement to another party
if the other party agrees to accept the terms and conditions of
this License Agreement. It is your responsibility to obtain such
agreement. If you transfer the Software, you must at the same
time either transfer all copies of the Software as well as the
supporting documentation to the same party or destroy any such
materials not transferred. Except as set forth above, you may not
transfer or assign the Software or your rights under this License
Agreement.
EXPORT RESTRICTIONS:
You agree that you will not export or re-export the Software or
accompanying documentation (or any copies thereof) or any products
utilizing the Software or such documentation in violation of any
applicable laws or regulations of the United States or the country
in which you obtained them.
TERMS AND CONDITIONS:
This License Agreement is effective until terminated. You may
terminate it at any time by destroying the Software and
documentation together with all copies and merged portions in any
form. It will also terminate immediately if you failed to comply
with any term or condition of this License Agreement. Upon such
termination you agree to destroy the Software and documentation,
together with all copies and merged portions in any form.
WARRANTY AND LIABILITY:
The Software has been thoroughly tested and determined to be
robust and bug-free at time of sale. The Software is provided "as
is", and without any warranty, expressed or implied, as to
non-infringement of third party patents, merchantability or
fitness for any particular purpose. The liability of SMC
Innovations shall be limited to the cost of the Software paid by
the Licensee. SMC Innovations shall not be held liable for
indirect, special, incidental, exemplary or consequential
(including, without limitation, loss profits) resulting from the
use of this Software.
SEVERABILITY:
In the event any provision of this License Agreement is found
to be invalid, illegal or unenforceable, the validity, legality
and enforceability of any of the remaining provisions shall not in
any way be affected or impaired and a valid, legal and enforceable
provision of similar intent and economic impact shall be
substituted therefor.
ENTIRE AGREEMENT:
This License Agreement sets forth the entire understanding and
agreement between you and SMC Innovations.
CHOICE OF LAW & FORUM:
This License Agreement shall be governed by the Laws of the
State of California and applicable U.S. Federal Laws. All
unresolved disputes arising out of this Agreement shall be
resolved at the U.S.D.C. of the Northern District of California.
SMC Innovations
http://www.smcinnovations.com